This page will discuss the use and customization of the North American Arms Mini-Revolver.
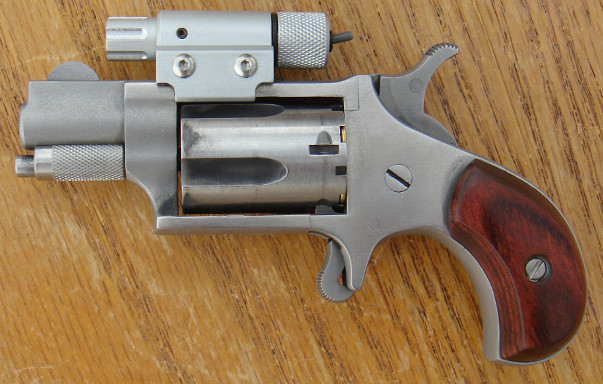
The NAA mini-revolver is one of the most compact and lightweight self-defense firearms available.
Calibers
The manufacturer makes the gun in three different calibers, .22 short, .22 long rifle, .22 magnum. The .22 magnum versions can also use a .22lr cylinder. Additionally, there are cap and ball versions which use black powder.
Weight and Size
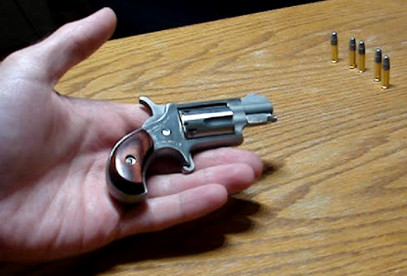
The .22lr version I have has a 1.125" barrel and weighs about 4.5 ounces, and a little more loaded. By comparison, the Kel-Tec P32, one of the most lightweight semi-automatic firearms, weighs 6.6 ounces unloaded and about 10 ounces loaded. The mini-revolver is about 4 inches long, 2.75" tall, and the cylinder is .8125" in diameter. The P32 by contrast is 5 inches long, 3.5" tall, and .75" wide. The P32 is a small gun, but there are places one can put a mini-revolver that would not work for the larger P32. The .22lr mini-revolver would fit in a box 30% smaller in volume, and weighs about half as much fully loaded. The .22 short version weighs about half an ounce less, and the magnum version weighs about 1.5 ounces more than the .22lr version. These figures are for the short barreled versions of the gun with the short standard grip. NAA makes some larger models, too, like the mini-master that has a 4 inch barrel and enlarged grips, but this article focuses on the smaller ones.
Single-Action Mechanism
As a single-action revolver, it must be cocked for every shot. The gun lacks a trigger guard, but can be safely carried loaded and uncocked because the trigger is incapable of cocking the revolver.
Safety Notches
Current production mini-revolvers have a notch between each chamber where the hammer can rest. The mini-revolver firing pin is built into the hammer and if lowered on a full cylinder without using the safety notch, it would be sitting directly on the rim of the cartridge. If the mini-revolver were dropped and landed on a hard surface, it could go off. The light weight of the revolver protects against this risk for short falls, but for safety, one should rest the hammer in the notches between the cylinders. This prevents the possibility of the gun firing if dropped. Cocking the hammer will go to the next chamber regardless of whether the hammer is resting in a safety notch or on the previous chamber, so there is no disadvantage to using a safety notch.
To lower the hammer into the notch, pull the hammer back until you hear the first click. Now the cylinder should rotate freely, and you can line up the cylinder notch with the hammer. Then, pull the hammer back just the tiniest bit, and you should be able to pull the trigger to drop the hammer gently into the slot.
Aiming the gun
The mini revolver is one of the more challenging guns to aim properly. It is single action only, and has a tiny grip that barely allows any purchase. The gun can be cocked rapidly and one handed but this disturbs the grip considerably. The gun also has very rudimentary sights that do not work in a conventional fashion, and a trigger which is very stiff. The single action mechanism and heavy trigger pull are by design. However, with proper grip, trigger pull, sight alignment, and some practice, the mini-revolver can be fired quite accurately.
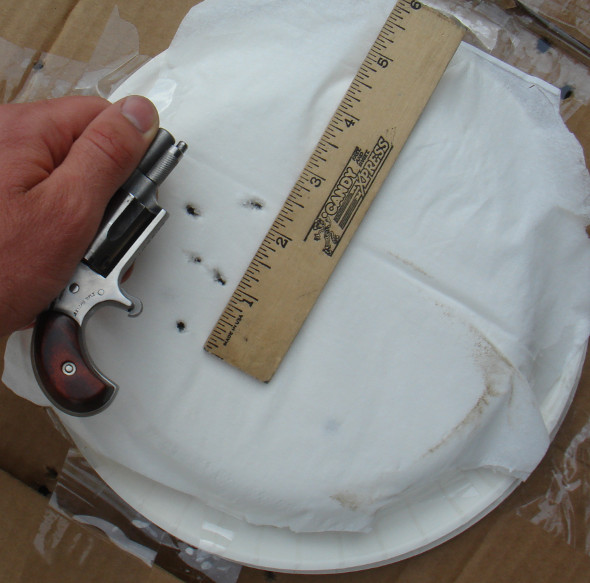
Shooting at an extremely slow rate, I was able to achieve a 2.33" 5 shot group from 7 yards one handed with Federal Automatch. Click on the picture of the target to see the video of the group being shot. (3.5 minutes long)
Gripping the gun
With the standard grip, there isn't much to hold onto with the NAA mini-revolver. An improper grip technique can easily cause the gun to pivot 45 degrees under recoil, or even fly out of the hand. Because the grip is so small, it isn't immediately obvious how to grip the gun properly. I find that the best technique is to get a death grip on it with the middle finger and ring finger of the shooting hand. The support hand can cup the bottom of the shooting hand. The mini-revolver has a very short cylinder, so it is very easy to accidentally allow the support hand fingers to be in front of the barrel-cylinder gap. This should be avoided as they can be burned by the hot gasses escaping from the gap.
I find that in order to cock the mini-revolver, it requires me to disturb the grip. It takes a little bit of practice to make sure you grip it properly every time after cocking the gun.
Grip Types
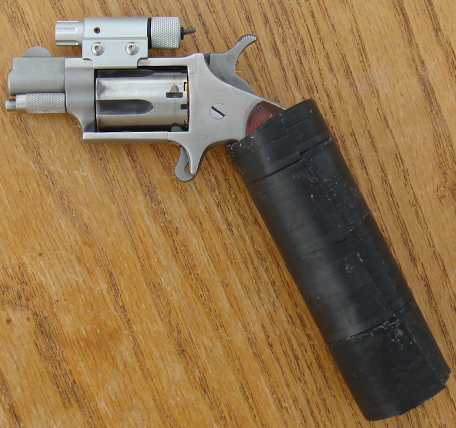
One reason the magnum version of the mini-revolver is often preferred over the .22lr version is that it has a larger grip. NAA also sells a few custom grip options, such as the folding "holster grip" which extends the grip considerably, as well as other enlarged grips. A larger grip will increase shootability but will decrease concealability. I made a custom grip from a cardboard tube that allows a full four finger grip on the gun, and it allows for pleasurable target practice. It is made from a cardboard tube with a 1 inch inner diameter and some extra rubber. It is held together with Elmers glue:
See NAA's website where they show the holster grip.
Sight Alignment
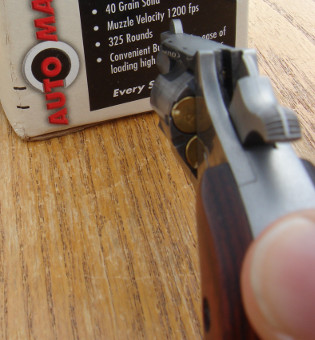
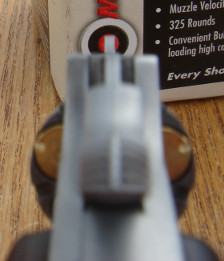
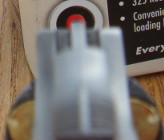
On a conventional handgun, the sights are aligned so that the front sight post is centered between two rear posts with the top of the sights level. On the mini-revolver, there is a front sight blade, but there isn't much of a rear sight. A person used to shooting conventional handguns is likely to use the hammer notch as a rear sight and put the front sight in the center of it. This alignment will result in low hits. To properly aim the mini-revolver, a different sight alignment is necessary. One should center the front sight in the back of the frame, and should make the entire front sight post visible above it. This will result in the shots hitting to the point of aim.
Pretend that the O on this box is a target out at 7 yards rather than an O on a box a few inches from the muzzle...
The proper sight alignment is shown in this image:
Aiming it this way would result in low hits:
Laserlyte Laser
I purchased an Laserlyte model NAA-1 laser for the mini-revolver. Unfortunately, this accessory blocks the front sight blade entirely when mounted on the gun. The battery life with three LR41 392 batteries is about 1.5 hours according to Laserlyte. The laser dramatically improves the ability to shoot the gun accurately, especially for people who have not mastered the NAA sight. However, for defensive purposes it is only really useful indoors or at night as it is very hard to pick up in broad daylight. After firing 150 rounds or so through the gun with the laser attached, my laser seemed to become intermittent and turn itself off. I took the laser off the gun and thoroughly cleaned it and that seemed to fix it. The mini-revolver spews a lot of carbon all over the place when you shoot, leaving black marks on the gun and on your hands. My guess is that filth somehow got inside and prevented a good contact between the batteries.
Don't spend too much on the 392 batteries. Last time I got them I was able to get 100 of them for $8 on Amazon.com.
To activate the laser, the switch on the back turns up and down. The switch is on the battery cap. When the battery cap is fully screwed on, up is the off position and down is the on position. This makes it easy to turn it on when moving to cock the revolver, but it is easy to turn it on accidentally in their pocket. By unscrewing the battery cap half a turn, up can be on and down can be off.
For the Black Widow and Mini-Master Laserlyte now makes a laser that replaces the cylinder release pin and does not obscure the sight picture.
Trigger Control
For a conventional handgun, it is generally fired using the tip of the index finger or the center of the first pad of the index finger. For the mini-revolver, the stiff trigger pull requires so much force that many shooters have a tendency to pull the gun off target. I have found that by putting the finger on the trigger just before the second knuckle I am able to make a much smoother trigger pull without pulling the gun off target.
Reloading
The reloading process for most NAA mini-revolvers involves the following steps. The hammer is pulled back until an audible click can be heard. Then, the button on the front of the cylinder pin is depressed, and the cylinder pin is pulled outwards. At that point, the cylinder should be able to roll out the right side of the gun, but if a laser is attached one must rotate the cylinder counter clockwise while pulling the cylinder to the left. The clamps that hold the laser in place must line up with the cylinder flutes in order to allow the cylinder to be removed.
Once the cylinder is removed, one can use the cylinder pin to punch the expended brass out of each chamber one at a time, then insert a fresh cartridge into each cylinder. Alternatively, if one has additional fitted cylinders, they could insert a new cylinder into the gun. The cylinder is rolled back into the gun from the right side, and centered. In order for the cylinder to go in, the hammer should still be in the uncocked first click position. The cylinder is then perfectly centered and then the release pin can be reinserted. If it doesn't go in easily, it probably is not centered properly.
At this point the gun is ready to fire, but one should lower the hammer into a safety notch to make it safe to carry.
This video demonstrates the basic process for reloading the gun and lowering the hammer into the safety notch:
NAA has also released a new model called the sidewinder which allows the cylinder to swing out like a conventional revolver rather than having to remove the cylinder first. In the past, NAA also made a limited number of "Ranger" model guns that had a top-break mechanism.
Ballistic Gel Tests
Content added on September 29, 2016:
On ShootingTheBull.net, a number of ballistic gel penetration tests were conducted with the .22LR mini-revolver.
I conducted some of my own tests in clear ballistics gel.
My results are as follows:
Gel Calibration BB: 605.1 FPS, 9.2 cm depthFederal Automatch, September 23, 2016 @ Cold Springs NV before Sunset
ft/s- 714.4
- 743.4
- 708.4
- 724.7
- error
- 7.75"
- 7.75"
- 8.25"
- 9.125"
- 9.875"
Winchester 333/555, September 23, 2016 @ Cold Springs NV before Sunset
FPS- 708.8
- 755
- 731.4
- 819.1
- 725
- 734
- 6.625""
- 5.3125"
- 7.125"
- 7.125"
- 9.375"
CCI small game 21 gr COPPER lead free
September 20, 2016 @ Cold Springs NV before Sunset
FPS- 1023
- 1059
- 3.75"
- 4"
- 4"
- 4.5"
- 5.875"
- 7.25"
- 7.25"
One of the 4" deep bullets hit the table and bounced back up again.
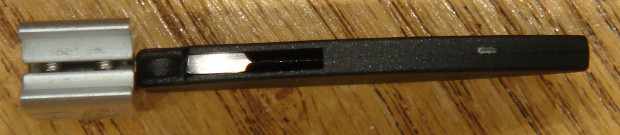
Bayonet
Laserlyte also makes a 1.85" blade KA-BAR bayonet for the mini-revolver that attaches to the take-down pin. It includes a sheath to make it safe to carry.

When attached, it makes a very secure connection with the take down pin. However, the take down pin will rotate a few degrees back and forth even when snapped into place, so the blade can wobble side to side a bit when it is mounted on the gun.
It is a bit tricky to take the bayonet off, but with practice it can be done rapidly. The sheath slides over the blade and a tab locks it in place behind the blade. To remove the sheath, one must pull the tab to the right to clear the rear of the blade and then it slides off.
With the assistance of my cat, here is a video showing the bayonet sheath operation:
Click here to see a longer video showing attachment of the bayonet to the revolver.
One must be careful with their approach when taking the sheath off. There is a 5/8 of an inch opening on the top of the sheath, and during the process of taking the sheath off the blade can protrude through this opening. One of the first times I tried to take the sheath off I put my left hand thumb over the top of it to push the tab to the right. I experienced first hand how sharp the blade is when I dragged my thumb along the top of the blade! One should pull the tab to the right from the right side, not push the tab to the right from the left side.
Holsters / Carry Techniques
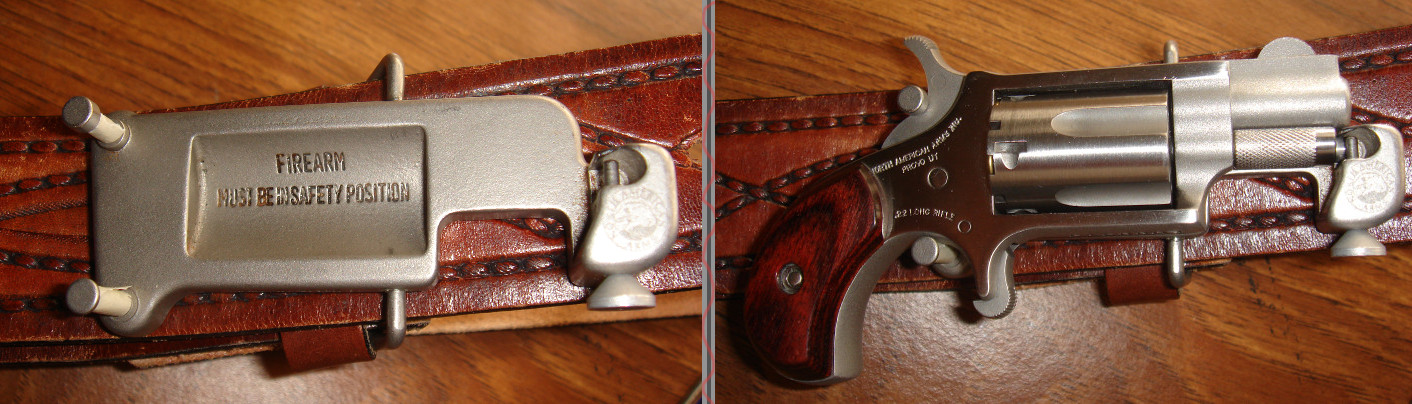
NAA makes a few holsters they sell from their website, including a nice outside the waistband holster. I have also found that my mini-revolver is small enough to fit in some flexible nylon knife sheaths I have. The folding holster grip also provides a way to clip the gun to you. There are also a number of belt-buckle holsters that allow one to wear the revolver as a fashion accessory. My mini-revolver will also fit in a sardine box, and in the coin pocket of most pairs of pants. See NAA's website where they show different belt buckle options.
Here is my NAA belt buckle. Scroll right to see the gun in the buckle.
Accessories
Most of the accessories available for the mini-revolver can be found from NAA directly or from Laserlyte, but you can often find better prices if you search elsewhere.